250 Box Challenge

3:58 AM, Friday May 3rd 2024

Box Challenge 1-50 - Album on Imgur

Imgur: https://imgur.com/a/ULN4Z1g

Discover the magic of the internet at Imgur, a community powered enterta...

50-100: https://imgur.com/a/i36O7I2

100-250: https://imgur.com/a/txLADW7

Sorry for some of the smudging (and the short color pencil lines arc)! Tried ways to fix it, but my color pens were just bleeding too much.

0 users agree
12:16 AM, Monday May 6th 2024
edited at 12:31 AM, May 6th 2024

Hi there, I'll be handling your box challenge critique.

Not only does the challenge help deepen your understanding of important concepts but it shows your desire to learn as well. That being said I'll try to keep this critique fairly brief so you can get working on the next steps as soon as possible.

Things you did well:

  • Your construction lines are looking smooth and confidently drawn when you're not redrawing them. Part of why we work with ink is so that we work with and learn from our mistakes, redrawing doesn't erase them and just creates a mess so try not to do it in the future. Take your time to plan your lines with the ghosting technique, draw confidently and then work with the results.

  • You're doing a great job of experimenting with orientations, and proportions. Experimenting is an important habit to build when learning any new skill, it helps form a more well rounded understanding. I hope you'll continue to display and nurture this habit in the future.

Things you can work on:

  • It's not a requirement of the challenge but I recommend practicing applying hatching in your future work. It's a useful tool to learn and the only way to improve is to practice.

  • I'd like you to experiment with rates of foreshortening more, in your final 150 boxes you tend to stick with lines that are closer to parallel and vanishings points that are further away. Be sure to mix in some boxes with closer vanishing points so you continue to build up experience with boxes of different varieties.

  • At times you're placing your vanishing point between the viewer and your boxes (boxes 68, 70, 79, 129, and 144 are examples of this). This leads to you extending your lines in the wrong direction and if your boxes lines were converging more they'd become more distorted because your lines are actually diverging from where the vanishing point would be. I'd encourage you to re-watch the video going over the process of drawing boxes as it shows that we can use our starting Y shape to consistently determine where our vanishing points are. Our starting Y's lines will always extend towards them.

  • There are times when your lines converge in pairs or you attempt to keep your lines a bit too parallel which results in them diverging. This is an example of lines converging in pairs, and this shows the relation between each line in a set and their respective vanishing point. The inner pair of lines will be quite similar unless the box gets quite long and the outer pair can vary a lot depending on the location of the vanishing point. Move it further away and the lines become closer to parallel while moving it closer increases the rate of foreshortening.

The key things we want to remember from this exercise are that our lines should always converge as a set not in pairs, never diverge from the vanishing point and due to perspective they won't be completely parallel.

I won't be moving you on to the next lesson just yet, each lesson builds off concepts in the previous course material so if you move forward with un-addressed issues you end up just creating further issues on top of them.

I'll be asking you for 20 more boxes please, experiment with rates of foreshortening more, do your best to extend your lines consistently in the correct direction and spend a bit more time on your linework to improve it's tidiness and reduce your over extending.

Once you've completed your boxes reply to this critique with a link to them, I'll address anything that needs to be worked on and once you've shown you're ready I'll move you on to the next lesson.

I know you can do this and look forward to seeing your work.

Next Steps:

20 more boxes please.

When finished, reply to this critique with your revisions.
edited at 12:31 AM, May 6th 2024
4:04 PM, Friday May 10th 2024

Hello there!

Thanks for the feedback! Here are the 20 boxes, I implemented your feedback as best as possible and went with more extreme convergence points for the majority of them. Also did hatching for all of them.

https://imgur.com/a/2Z9jaEQ

10:18 PM, Friday May 10th 2024

No problem.

Your boxes are looking pretty solid here, there's just one thing I need to point out.

In boxes 259, 261, 262, and 263 you're hatching one of the rear facing planes rather than the front facing ones as instructed. Remember that your starting Y will imply the 3 front facing planes that you can choose from to hatch. Otherwise you've done a good job.

I'll be marking your submission complete, keep practicing boxes and previous exercises as warmups and best of luck in lesson 2.

Next Steps:

Move on to lesson 2.

This critique marks this lesson as complete.
The recommendation below is an advertisement. Most of the links here are part of Amazon's affiliate program (unless otherwise stated), which helps support this website. It's also more than that - it's a hand-picked recommendation of something I've used myself. If you're interested, here is a full list.
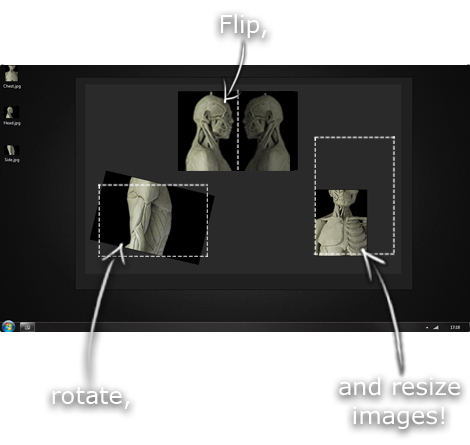
PureRef

PureRef

This is another one of those things that aren't sold through Amazon, so I don't get a commission on it - but it's just too good to leave out. PureRef is a fantastic piece of software that is both Windows and Mac compatible. It's used for collecting reference and compiling them into a moodboard. You can move them around freely, have them automatically arranged, zoom in/out and even scale/flip/rotate images as you please. If needed, you can also add little text notes.

When starting on a project, I'll often open it up and start dragging reference images off the internet onto the board. When I'm done, I'll save out a '.pur' file, which embeds all the images. They can get pretty big, but are way more convenient than hauling around folders full of separate images.

Did I mention you can get it for free? The developer allows you to pay whatever amount you want for it. They recommend $5, but they'll allow you to take it for nothing. Really though, with software this versatile and polished, you really should throw them a few bucks if you pick it up. It's more than worth it.

This website uses cookies. You can read more about what we do with them, read our privacy policy.