250 Box Challenge
11:22 AM, Friday May 3rd 2024
Thanks for your time, have a great day :)

Hi there, I'll be handling your box challenge critique.
Not only does the challenge help deepen your understanding of important concepts but it shows your desire to learn as well. That being said I'll try to keep this critique fairly brief so you can get working on the next steps as soon as possible.
Things you did well:
Good work drawing your construction lines confidently, this keeps your lines smooth and prevents wobbling.
You're doing a great job of experimenting with orientations, proportions and rates of foreshortening. Experimenting is an important habit to build when learning any new skill, it helps form a more well rounded understanding. I hope you'll continue to display and nurture this habit in the future.
Things you can work on:
It's not a requirement of the challenge but I recommend practicing applying hatching in your future work. It's a useful tool to learn and the only way to improve is to practice.
At times you're placing your vanishing point between the viewer and your boxes (boxes 140 189, and 222 are examples of this). This leads to you extending your lines in the wrong direction and your boxes becoming distorted (even more so if they converged more dramatically) because your lines are actually diverging from where the vanishing point would be. I'd encourage you to re-watch the video going over the process of drawing boxes as it shows that we can use our starting Y shape to consistently determine where our vanishing points are. Our starting Y's lines will always extend towards them.
There are times when your lines converge in pairs or you attempt to keep your lines a bit too parallel which results in them diverging. This is an example of lines converging in pairs, and this shows the relation between each line in a set and their respective vanishing point. The inner pair of lines will be quite similar unless the box gets quite long and the outer pair can vary a lot depending on the location of the vanishing point. Move it further away and the lines become closer to parallel while moving it closer increases the rate of foreshortening.
The key things we want to remember from this exercise are that our lines should always converge as a set not in pairs, never diverge from the vanishing point and due to perspective they won't be completely parallel.
I won't be moving you on to the next lesson just yet, each lesson builds off concepts in the previous course material so if you move forward with un-addressed issues you end up just creating further issues on top of them.
I'll be asking you for 10 more boxes please. Do your best to extend your lines consistently in the correct direction.
Once you've completed your boxes reply to this critique with a link to them, I'll address anything that needs to be worked on and once you've shown you're ready I'll move you on to the next lesson.
I know you can do this and look forward to seeing your work.
Next Steps:
10 more boxes please.
These are all extending correctly and it's nice to see that you gave hatching a try as well. Good work, I'll be moving you on to lesson 2.
Keep practicing boxes and previous exercises as warmups and best of luck in lesson 2.
Next Steps:
Move on to lesson 2.

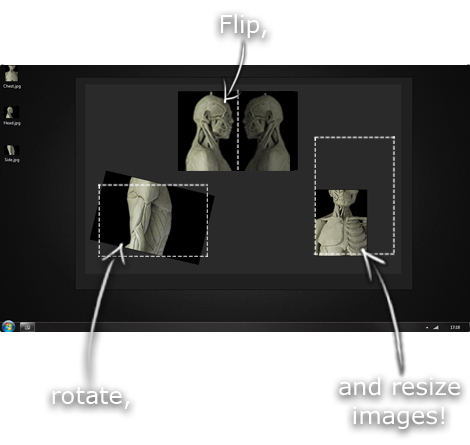
This is another one of those things that aren't sold through Amazon, so I don't get a commission on it - but it's just too good to leave out. PureRef is a fantastic piece of software that is both Windows and Mac compatible. It's used for collecting reference and compiling them into a moodboard. You can move them around freely, have them automatically arranged, zoom in/out and even scale/flip/rotate images as you please. If needed, you can also add little text notes.
When starting on a project, I'll often open it up and start dragging reference images off the internet onto the board. When I'm done, I'll save out a '.pur' file, which embeds all the images. They can get pretty big, but are way more convenient than hauling around folders full of separate images.
Did I mention you can get it for free? The developer allows you to pay whatever amount you want for it. They recommend $5, but they'll allow you to take it for nothing. Really though, with software this versatile and polished, you really should throw them a few bucks if you pick it up. It's more than worth it.
This website uses cookies. You can read more about what we do with them, read our privacy policy.